So I’ve finally overcome distraction and procrastination enough to put together my first tutorial! (props for progress).
Project: simple shaped 3d/tubular peyote stitch conical shape
So that title sounds kind of funny.
 |
| There's a larger picture of this fun necklace at the bottom of the page :) |

Peyote stitch, if you’re unfamiliar, is a type of beading stitch. It’s surprisingly simple when you get the hang of it because each “stitch” or bead placement is clearly marked out as each new bead goes between two raised “lower level” beads. Here’s a nifty diagram:
Materials:
-11/0 seed beads
-shape mold (I used a metal tooth shape, which I found in the bead section at Hobby Lobby)
-the mold is mildly optional, but it makes it so much easier to keep the beading tight and uniform. Hollow shapes just squish and deform so easily, darn them.
-beading needle
-thread (typically I use actual beading thread, but this project didn’t really demand that something so specialized so regular sewing thread will do as long as it doesn’t break, curl, or tangle easily)
-for this project, you’ll need about 90” of thread. If this is an intimidating amount of tangable and knotable possibilities, then use a shorter length and tie more thread on later when you need it. The tails and knots of added thread can be hidden inside the hollow body of the shape.)
Step 1: beginning the tube
To make tubular peyote work easily, you need an even number of beads so that the up/down pattern is continuous around the mold.
String on an even number of your weapon, er, bead of choice so that they will form a loop that fits around the largest part of your shape. It took 18 seed beads to fit around the top of the metal tooth.
Run the thread through string of beads again, going the same direction you originally did (if you go back through the beads, going opposite the original direction, your beads will all just fall off, and that’s not how you start peyote stitch.). This will form a nice little loop.
Step 2: row 2

Your thread is now coming out of
bead 1 (row 1). String 1 bead. This one bead is the beginning of the second row, and it will sit next to
bead 2 (row 1). Run the needle through
bead 3 (row 1), add another bead to sit next to
bead 4 (row 1), string though
bead 5 (row 1), and so on til you’ve finished row 2 (this will mean you have 9 beads in row 2 if you’re using 11/0 seed beads and a big metal tooth like mine).
 |
| you should end up with this neat little sunburst, which the following row will form into a tube |
Step 3: moar rowz!
When you reach the end of a new row, you may be wondering “How in the world do I get to the next row?? This silly first bead of the row I just finished is in the way!”. (Well, after you’ve placed the final bead of a row, you should have come up on the spot of that row’s first bead.) Go ahead and run the thread up through that first bead. Then, it becomes the same thing as bead 1 (row 1) and you’re set to place the new first bead.
Get really comfortable with adding rows this way, and go ahead and add about 10 more rows (remember that row 1 is really two staggered rows mushed together; it has 18 beads while all following rows have 9 each).
Congrats! You’ve made your first tubular section! This is technically a straight tube, but the shape of the mold gives the tube a bit of an angle. The idea here is to add straight rows to the tube until the next row won’t fit snug and tight against the mold.
Step 4: beginning the next section
Now is the time for learning decreases. Simply, when you’re working on the first row of a smaller section, you just leave out a bead. Yep, you skip it. Don’t add it into its allotted spot and instead thread through the corresponding bead below the now-empty spot so that you hide the thread, and pull the gap tight. The rest of the row is beaded normally.
 |
| the decrease gap is in the center of the image, if you're playing "where's the decrease gap". yes, there is a prize for finding it w/o this caption: a sense of pride and accomplishment. |
Tip: I’m a bit, well, “detail-oriented” when it comes to symmetry and such. So, I made sure that all of my decreases were along the same line at the back of the cone shape. The decreases create small “puckers” and I wanted to make sure that these were hidden at the back.
When you reach that empty spot when working on your next row, you’ll have gap of 3-ish beads to fill. Just treat it like a normal stitch and fill it with only one bead, filling up the row normally. Be sure to pull this all tight so that it doesn’t gap up and show the thread and look all messy.
After a decrease, make another “straight” tube section like you made for the beginning. You continue making these decreased sections until you reach the end of the mold. My shape took 6 sections.
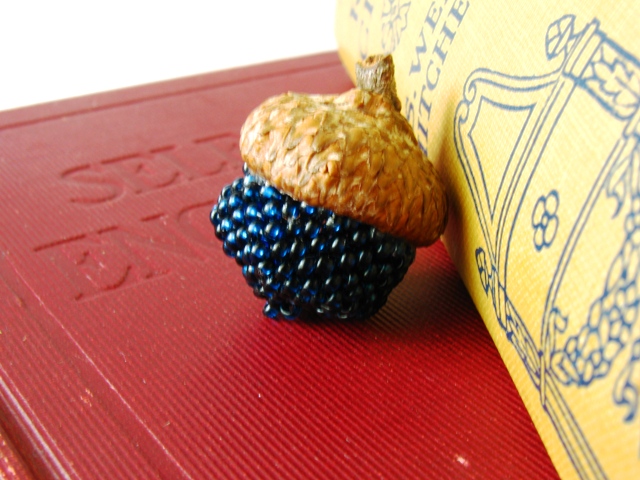
Step 5: finishing the cone shape
This part can be hard. Like, ugly and nasty and make you dislike conical shapes.
Unless you keep your wits about you.
By this time you’ve decreased to about 5 beads per row and you’ve run out of room on the mold itself. Don’t panic, this is kind of key. Just get in your zen spot and keep on keeping on in the same pattern you have been: making rows, decreasing, and keeping the stitches tight.
At the end you decrease from 3 beads, to 2, to 1 final bead, hurrah! You don’t really have to worry about precision here, because you can always run the thread through the beads again, making them tight and pulling them into the shape that you want.
 |
| a bit crookedy, but meh, I don't ask for perfection when working at 2 am |
To “tie off” the thread, run it through a number of beads, preferably in zigzaggy directions so that it will stay put, then cut it.
You’re done with the cone shape! Yay!
Step 6: making the loop
Here, I did a bit of freehanding because it was late at night and I was pretty tired.
But, take a length of thread and run it through row 1, the top of the cone (or, if you have enough left, you could run the thread from the bottom of the cone back up to the top).
You can simply bring the thread up out of one side of row 1, string about 7 beads, and then run the needle back into row 1 on the opposite side of the cone.
Or, if you’re more comfortable with peyote stitch and want to be all fancy: build two triangles, one at the front and one at the back of the cone, then string a number of beads to connect the tops of the two triangles.
Tie off the thread the same way as at the bottom of the cone, by running it back through beads in the cone shape.
Step 7: you’re done, go enjoy crafting with your brand-spankin-new beaded focal piece!
Here’s a picture of what I ended up doing with mine. Simple, and actually not really my style, but I love what it grew into. ^_^!